Setting up a wireless microphone system seems simple on the surface—plug it in, power it up, and go. But anyone who’s dealt with signal dropouts, interference, or odd buzzing noises mid-performance knows it’s not always that straightforward.
Whether you’re prepping for a live gig, church service, podcast recording, or karaoke night, getting your wireless mic setup right from the start saves time, stress, and a lot of troubleshooting down the line.
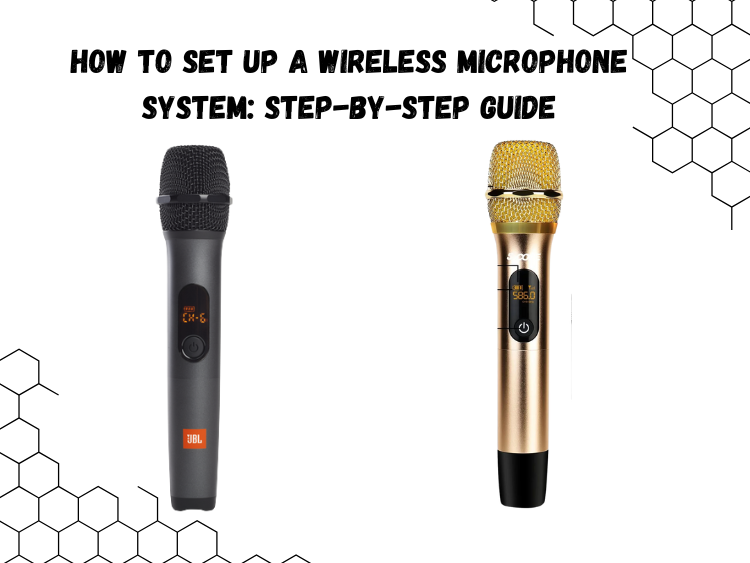
This guide walks you through each part of the process—from unboxing to frequency coordination—using two popular systems: the 5 Core UHF Dual Karaoke Mic (Gold) and the JBL Wireless Microphone System. These cover the spectrum from casual use to semi-professional setups, so the steps here will work no matter your use case.
Step 1: Understand the Basics – Transmitter and Receiver
A wireless mic system has two core components:
- Transmitter – usually housed inside the mic itself or in a bodypack. It sends your audio signal wirelessly.
- Receiver – a separate unit that picks up the signal and sends it to your PA system, mixer, or speaker.
The 5 Core WM-UHF-02-GLD, for example, includes two rechargeable handheld mics with built-in UHF transmitters and a single receiver unit. On the other hand, the JBL Wireless Microphone System also uses a dual-channel receiver with separate mics, making it ideal for duos or hosts.
No matter which brand you’re using, the setup always comes down to these two pieces talking to each other without interference.
Step 2: Power Up the Receiver First
Always start by powering on your receiver before the microphone. This ensures that the receiver is actively searching for a signal and avoids confusion during syncing.

For the 5 Core system, plug in the receiver to a wall outlet or USB power source, then connect it to your speaker or mixer via the included ¼-inch output cable. You’ll typically see an indicator light confirming it’s powered and ready.
The JBL model also uses a straightforward setup: connect it to any standard speaker system or portable PA via AUX or ¼-inch jack. Once connected, the receiver enters pairing mode automatically.
Step 3: Insert or Charge Batteries
Before powering up your microphones, make sure the batteries are charged. Some systems—like the 5 Core WM-UHF-02-GLD—use built-in rechargeable batteries. You’ll typically get 4–6 hours on a full charge, depending on usage.
Others, like the JBL system, require AA batteries for each mic. Always use fresh, brand-name batteries to reduce the risk of mid-use dropouts or inconsistent signal performance.
Step 4: Pair or Sync the Microphones
With the receiver on and ready, power on your microphone. In most cases, the mic and receiver are pre-paired to a fixed frequency or channel. But if you’re using a system that allows channel selection:

- Check the receiver’s screen or dial to see what channel it’s set to.
- Match that channel manually on the microphone (if your mic has that capability)
- Wait for a solid signal indicator—usually an LED light or an icon on the receiver screen.
For UHF systems like 5 Core’s, frequency coordination is already handled internally, and the system is designed to avoid common interference bands. No complicated scanning or syncing is necessary.
However, in dense environments—like venues with multiple wireless systems—it’s good practice to space frequencies at least 1 MHz apart to avoid overlap.
Step 5: Test the Signal & Adjust Volume
Once your system is connected and synced, perform a basic mic check:
- Speak at a natural volume and listen through your speaker or monitor.
- Adjust gain or volume on your mixer/amp—not on the mic, unless it has built-in gain control.
- Walk around the space while talking or singing to check for signal dropouts or interference.
Both the JBL and 5 Core systems are rated for strong signal stability—around 100 to 210 feet of operating range. Still, physical obstructions like metal trusses, large LED walls, or wireless routers can affect clarity.
If you’re experiencing distortion or feedback, lower your gain on the mixer and make sure no other wireless systems are using overlapping frequencies.
Step 6: Secure and Label Your Gear
Especially in shared spaces like churches, schools, or community halls, it’s easy to misplace mics or mix up receivers. Once your system is working:
- Label your mics and receiver with color-coded tape or a simple name tag.
- Secure loose cables using Velcro or zip ties.
- Place the receiver in a stable location where it’s unlikely to be bumped or unplugged accidentally.
The gold finish on the 5 Core wireless mic makes it easy to identify at a glance—especially helpful in dimly lit venues.
Final Thoughts: A Few Minutes Now Saves Hours Later
Setting up a wireless microphone system isn’t rocket science—but it does demand attention to detail. One skipped step or lazy pairing job can ruin a full session, sermon, or performance.
If you’re running a two-mic setup for events or karaoke, the 5 Core UHF Gold Dual Mic System gives you reliable, rechargeable performance with solid signal clarity. And for users who need plug-and-play simplicity, the JBL Wireless Microphone System keeps things foolproof without sacrificing sound quality.
So the next time you reach for that wireless mic, take a few extra minutes to set it up right. The difference between amateur and professional audio often comes down to what happens before the mic even goes live.